
Creative Agency Client Onboarding Checklist Template
Creative work goes wrong in a specific way at the start: the brand kit arrives in pieces. The primary logo comes over, but not the reversed version; the fonts show up without their licences; the colour values are a screenshot, not a swatch.
Free to download and edit · No watermark · Add your own branding
Three weeks in, a complete brand book finally surfaces and contradicts half of what the studio has already designed. A structured onboarding checklist is how you stop that, by immersing in the brand once, collecting the whole kit before anyone designs, and documenting the creative direction so the first concept lands where the client imagined.
This page gives you a free, editable Creative Agency Client Onboarding Checklist template for design and branding studios, built around the things creative work specifically needs: a brand immersion, a complete brand-kit collection, a creative brief, and a clear approval and version-control workflow. It runs on a timeline from signed contract through the first weeks of the engagement. Download it, add your branding, assign owners, and run it for every new creative client.
What Is Creative Agency Client Onboarding?
Creative agency client onboarding is the structured setup a design or branding studio runs between a signed contract and the start of creative production.
It covers immersing in the brand, collecting the complete set of brand assets and guidelines, agreeing the creative direction, setting the approval and revision workflow, organising files and naming conventions, and gaining access, so the studio can produce on-brand work from the first deliverable.
What sets it apart from onboarding other services is that the studio is taking custody of a brand, not a task list. Creative work is produced in the client's visual and verbal identity, often as an ongoing partner rather than a one-off job, which means onboarding has to absorb something a brief alone cannot capture: how the brand looks, sounds, and feels, and the full toolkit that keeps every piece consistent.
What the checklist covers besides the phases
Get a partial picture and the output drifts off-brand; get the brand kit late and you redesign what you have already made. A missing brand guideline is worse than a missing login: the login stalls a task but leaves finished work intact, while the wrong hex value can invalidate templates, decks, and mockups already built, sending them back to the start once the correct brand colours arrive.
The recurring failure is the piecemeal brand kit. Studios consistently find that incomplete assets, logos trickling in, fonts without licences, colours without exact values, are what force mid-project redesigns. A good onboarding checklist treats the brand kit as a single, complete collection with an owner for every file, gathered once, before design begins, rather than assembled by email over weeks.
How to Structure Creative Onboarding: Three Phases
Creative onboarding works best as a timeline that front-loads brand understanding before any production starts. Structuring it in three sequential phases — internal setup, immersion and collection, then kickoff — ensures the complete brand kit and creative direction are locked in before the first concept is touched, which is where most off-brand output and revision loops originate.
Before You Start
First 48 Hours6 tasks
Immersion and Collection
First One to Two Weeks8 tasks
Ready to Create
Kickoff5 tasks
Why Your Agency Needs a Creative Onboarding Checklist
A repeatable creative onboarding checklist closes the gaps that specifically derail design work.
It collects the whole brand kit before you design
Gathering every logo variant, exact colour values, licensed fonts, and the brand book into a single owned collection prevents the mid-project redesign that an incomplete kit forces — making this the highest-value step in creative onboarding.
It captures the brand once, not repeatedly
A documented immersion the whole team reads stops discovery from happening three times across three people, keeping the client relationship smooth from the start.
It aligns direction before the first concept
A signed brief with mood boards and style references means the first design reads as "on-brand" rather than triggering a redo because the client pictured something else.
It sets a versioned approval workflow
Defined revision rounds, feedback deadlines, and file versioning keep creative feedback structured — so "can we try it in blue?" lands in a trackable round rather than an endless stream.
The Risks of Skipping Structured Creative Onboarding
Skipped onboarding steps don't announce themselves — they surface later as unbillable hours, stalled deliveries, and clients who quietly don't return. Below is each failure mode as it tends to play out, alongside a rough sense of what it actually costs a studio.
Design starts with half the assets. The full brand book arrives in week three and contradicts work already approved, triggering a rebuild the studio absorbs silently. Depending on the project size, that can mean eight to fifteen hours of unpaid design time — enough to erase the margin on a mid-tier branding project entirely.
The designer asks the client about their audience on Monday. The strategist asks the same question on Wednesday. The account lead follows up on Friday. By the third ask, the client has formed an opinion about the studio's internal communication — and that opinion follows them to their next agency search.
Without a signed brief or agreed visual direction, the first concept misreads the brand's register. The studio rebuilds from scratch, typically burning a full creative day. More damaging is the trust cost: a client who sees a badly missed first concept rarely gives generous feedback rounds after that.
Feedback arrives across email threads, voice notes, and a shared document nobody updated. Three versions of the same file exist with names like "final," "final\_v2," and "ACTUAL\_final." Billing for legitimate extra rounds becomes difficult to justify when there is no agreed revision baseline to point to.
The studio is ready to publish or hand off. Platform credentials were never collected. Delivery stalls for days while logins are chased across time zones, a delay that falls on the studio in the client's memory regardless of whose responsibility it was.
Each of these maps to a specific step in the checklist below.
The Creative Onboarding Checklist, Phase by Phase
The template holds this full checklist as checkboxes with owner and due-date columns, plus the brand-kit collection checklist, a brand-immersion worksheet, the creative brief, the approval and version-control rules, and the access list. Here is what each phase covers.
Before You Start
Brief the creative team on what was sold, the goals, the scope, and anything promised.
Confirm the client is in, name their main contact, and preview the first steps and what you will need from them.
A single home for the immersion notes, the brand kit, the brief, revisions, and communication.
The creative lead, the designer, and who the client escalates to.
Immersion and Collection
One deep conversation covering the brand's story, personality, audience, positioning, and what it stands for and against. Document it so the whole team works from the same understanding and never asks the client the same question twice.
Audience, positioning, competitors, goals, visual preferences, and what the client loves and hates about their current brand presence.
The step that prevents mid-project redesigns. As a single owned collection: every logo variant (primary, horizontal, icon, reversed), exact colour values (HEX, RGB, CMYK, and Pantone where relevant), licensed fonts with their terms, the brand guidelines or brand book, and the photography and imagery library. Gather it all before design begins, not piecemeal.
Capture goals, audience, tone, style direction, and mood boards or reference work, and get stakeholder approval before producing concepts.
Agree the revision rounds, the feedback deadline, the proofing process, and a file-naming and versioning convention so everyone knows which version is current.
Any platforms, drives, scheduling, or publishing tools the work depends on, gathered now so delivery is not held up later.
Ready to Create
Check off the complete brand kit, the signed brief, the approval rules, and access before production starts.
Confirm the rounds included, what counts as a round, the rate beyond it, and the client's feedback deadline, so the work keeps moving.
Establish the folder structure and naming conventions in the shared workspace, so versions stay legible from the first deliverable.
Recap the immersion, the brief, the direction, and the feedback process, then begin production on a complete, agreed foundation.
The step most creative templates skip
Most creative onboarding templates list "collect brand assets" as one line, which is exactly how the kit ends up incomplete. The step they skip is a complete-kit gate, a requirement that every logo variant, every colour value, the licensed fonts, and the brand book are all in and owned before a single concept is produced. Partial kits are the number-one cause of creative rework, and they slip through because "we have the logo" feels like enough. The free template makes the complete kit a checked gate, not a trickle.
Tips and Best Practices for Creative Onboarding That Keeps Work On-Brand
Having the steps in order is only part of it. What keeps creative work on-brand and on-budget is a handful of disciplines around the kit, the direction, and the feedback.
Run one structured immersion and record it
A single session covering brand story, visual do's and don'ts, audience tone, and positioning, written up as the team's source of truth, is what stops discovery repeating and the client losing patience.
Treat the brand kit as all-or-nothing before design
A complete, owned collection, not a logo today and fonts next week, is what prevents the redesign an incomplete kit forces.
Sign off the direction before the first concept
A documented brief with mood boards turns "that's not us" into a conversation you had before the work, not after it.
Cap revision rounds and version every file
Written limits plus a naming convention such as `Client_Deliverable_v01_YYYYMMDD` keep creative feedback from becoming an untrackable loop, and make the current version unambiguous at a glance.
Set the folder structure and naming rule on day one
Establishing it before volume builds means everyone always knows where files live and which version is current.
State the feedback deadline and its consequence
If the client misses a review window, name what happens, the schedule shifts by the days lost rather than the studio absorbing them, so slippage stays visible and attributable.
How to Use the Free Creative Onboarding Checklist Template
Getting the checklist ready for a creative client takes four steps.
Start from a copy
Download the Word (.docx) file, or upload it to Google Docs, and work on your copy, not the original.
Give every asset an owner and a date
Fill the owner and due-date column, especially for each piece of the brand kit, so nothing arrives late.
Brand it
Add your logo and colours so the checklist reads as part of your studio's process.
Run it per client
Duplicate it for each new creative client and work through the phases, treating the complete-kit collection and brief sign-off as gates before production.
Running Creative Onboarding Inside a Client Portal
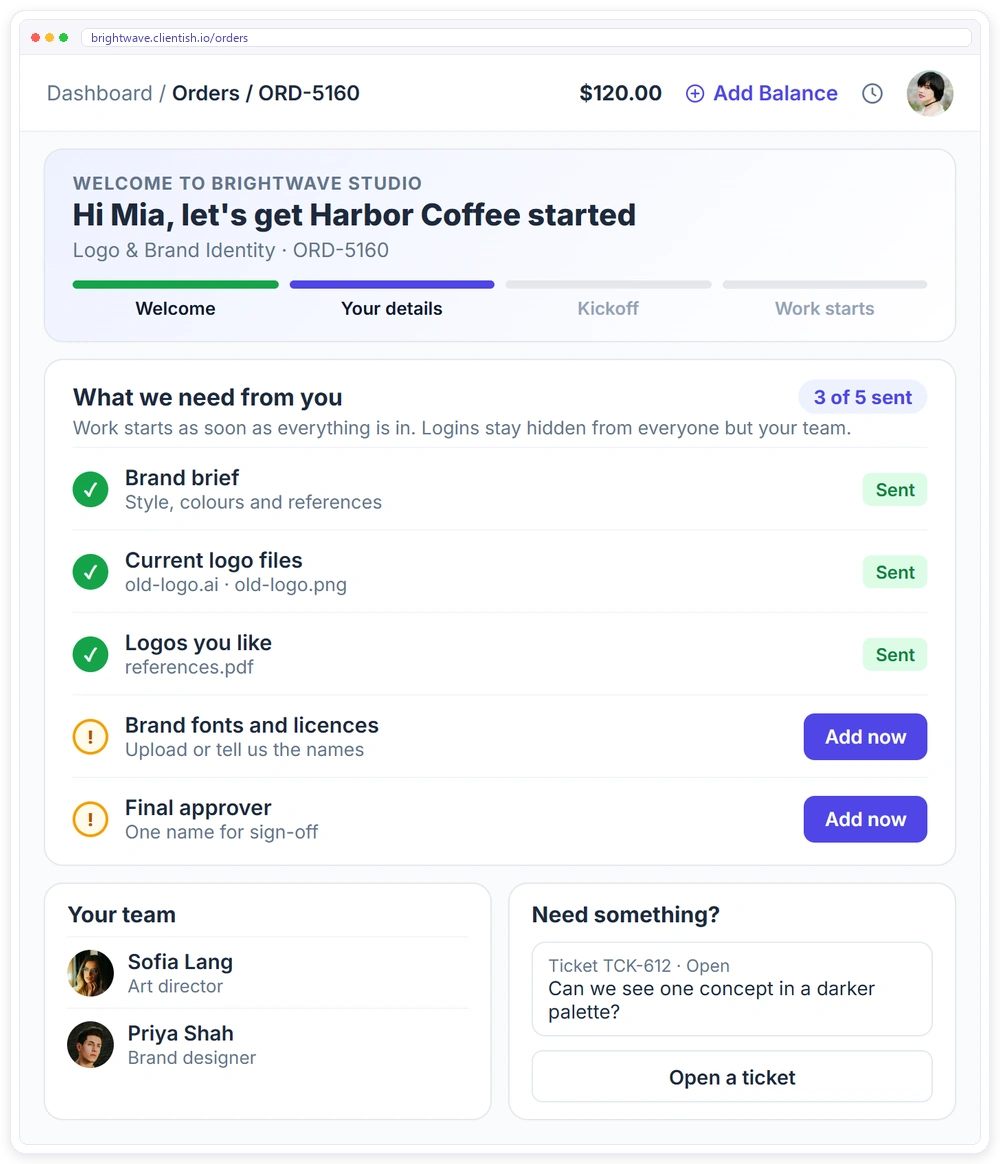
A checklist keeps your studio organised. What the client experiences, though, is the welcome, the asset requests, the approvals, and the invoices, and that experience is what a client portal carries.
- ✓A branded client portal on your own subdomain from day one, with orders, invoices and subscriptions
- ✓An onboarding form attached to the service, so the order waits until the client sends what you need
- ✓Logins collected in hidden fields that only your team sees
- ✓Clients open a support ticket with SLA response times instead of chasing you by email
- ✓A task template creates the onboarding tasks with owners and due dates for every new client
Download the free creative agency client onboarding checklist template
The editable Word checklist with 19 tasks across three phases, plus brand kit checklist — collect complete, not piecemeal, brand immersion worksheet, creative brief and direction. Add your branding and run it for every new client.
Frequently asked questions
Is this creative onboarding checklist template free to use?
Yes. There is no watermark and no cost. Open it in Google Docs, Google Sheets, or Word, add your branding, and run it for every creative client you take on.
What should a complete brand kit include at onboarding?
Every logo variant (primary, horizontal, icon, reversed) in vector format where possible, exact colour values (HEX, RGB, CMYK, and Pantone where relevant), licensed fonts with their terms, the brand guidelines or brand book, and the photography and imagery library. The template collects all of it as a single owned checklist, because partial kits are the top cause of creative rework. If the client has no brand book, capture the closest equivalent and write up the key decisions yourself so there is a working reference before production starts.
What is a brand immersion session?
It is one deep, documented conversation at onboarding that captures the brand's story, personality, audience, and positioning, so the whole team works from the same understanding. Documenting it is what stops discovery from repeating across different team members, which is a common client frustration.
How many revision rounds should a creative project include?
Commonly two or three rounds per deliverable, with a defined feedback deadline and an hourly rate beyond the included rounds. The number matters less than writing it down at onboarding, along with a file-versioning convention so the work stays trackable.
How long does creative onboarding take?
The immersion, kit collection, and brief usually run across the first one to two weeks, and production starts once everything is confirmed. The template front-loads all of it so the first concept is built on a complete, agreed foundation.
Related Templates
If you onboard creative clients alongside other services, these free templates pair well with this one: More free, editable templates from the Agency Templates Library.
Client Onboarding Checklist
The 3-phase onboarding checklist for any agency.
CHECKLISTWeb Design Onboarding Checklist
Content owners, assets, brief and sitemap.
RETAINERCreative Agency Retainer
Design and branding retainers with revision limits.
CONTRACTStatement of Work (SOW)
Scope, deliverables, acceptance and milestones per project.
BRIEFCreative Brief
Align the team and the client before work starts.
PROJECTChange Request Form
Turn scope creep into a priced, approved decision.
CHECKLISTSEO Client Onboarding Checklist
Access, baseline and Search Console set up in week one.
CHECKLISTSocial Media Onboarding Checklist
Voice, content pillars and the approval workflow.
CHECKLISTPPC Client Onboarding Checklist
Conversion tracking, MCC access and billing ownership.
CHECKLISTWeb Design Onboarding Checklist
Content owners, assets, brief and sitemap.