

A client job rarely follows a straight line. It starts as an inquiry, becomes an agreement, turns into active work, generates an invoice, occasionally triggers a support request, and eventually reaches delivery. Each of those stages is real work, and in most service businesses, each one lives in a different place — a spreadsheet for leads, an email thread for briefs, a separate tool for tasks, another for invoices, and something else again for client communication. By the time a job is done, you’ve manually copied context from one place to another half a dozen times, and the people doing the work rarely have the full picture.
Quick answer: Clientish manages the entire client workflow in a single connected system — from the moment a lead arrives, through onboarding, order management, team assignment, task tracking, invoicing, payment, and support, all the way to delivery. Each stage passes its context forward automatically, so nothing needs to be re-entered and no one is working blind.
This article walks that journey in order, stage by stage, showing exactly what happens at each step and how it connects to the next.
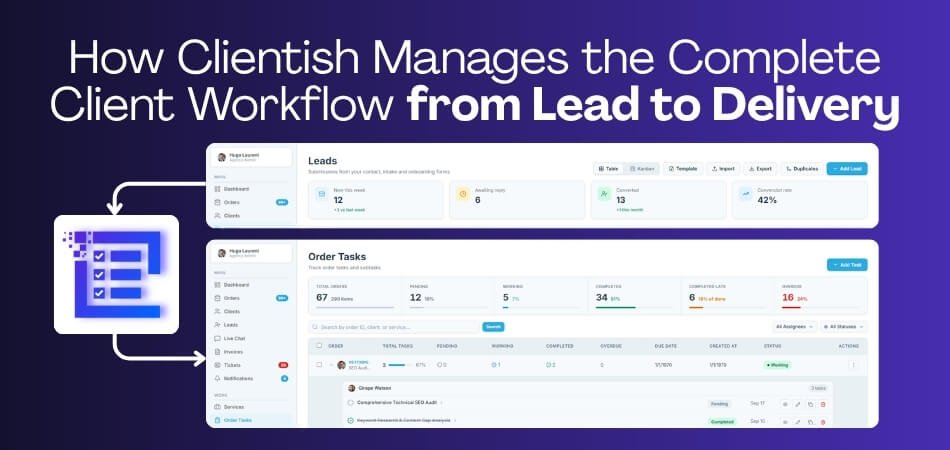
The Client Workflow at a Glance
Every client job in Clientish moves through the same connected sequence. Here’s the full path, in order:
- Lead — A prospect enters the system as a lead record, with owner, status, source, and value tracked from the start.
- Client — Once qualified, the lead converts to a client in one step, carrying its history forward.
- Order — The client purchases a service, creating an order that acts as the central work record.
- Team assignment — One or more team or remote members are assigned to the order to own the work.
- Tasks — The order breaks into trackable task items and checklists, with statuses and assignee filters.
- Invoice — An invoice is generated directly from the order, built from the service catalog.
- Payment — The client pays through a connected gateway; the client lifecycle stage advances automatically on payment.
- Support — Tickets tie back to the client record, keeping post-sale communication in context.
- Delivery — The order moves to a completed status, the client rates the work, and the record closes.
Each stage hands something off to the next — context, data, and history travel with the job rather than getting re-entered. The sections that follow walk each stage in detail, showing exactly what Clientish does at each step and how the handoff works.
Stage 1 — Capturing and Converting the Lead
Before any work starts, there’s a person somewhere who’s interested but hasn’t signed anything yet. This is where the Clientish lead stage lives — a lightweight CRM layer that lets you track, work, and eventually convert that person without losing any of the context you’ve built up along the way.
How Leads Enter
Leads can be added manually inside Clientish, or they can come in through the website lead capture API, which lets a contact form on your own site create a lead record automatically and hand a chat link back to the visitor. Each record stores the lead’s owner, source, current status, estimated value, and notes — enough to know where a lead came from and who’s responsible for it.
Talking to a Lead Early
Every lead gets a private magic-link chat page. The lead doesn’t need an account — you send them the link and they can message you directly from it. The link can be renewed if it expires, and you can see typing indicators and edit or delete messages. For leads who prefer email, you can send from inside the record, schedule a send for a specific time, and see whether they opened it.
Following Up Without Dropping It
Follow-ups are set with a time and tied to the workspace timezone, so the reminder lands for whoever’s active. It’s a simple but reliable way to make sure a lead you haven’t heard from in two weeks doesn’t quietly disappear off the radar.
Avoiding Duplicates
Clientish runs duplicate detection on leads and surfaces a dedicated duplicates review screen. You can merge two records into one, or deliberately dismiss a match as “not a duplicate” if they’re genuinely different people. That keeps the directory clean before anyone becomes a client.
Converting to a Client
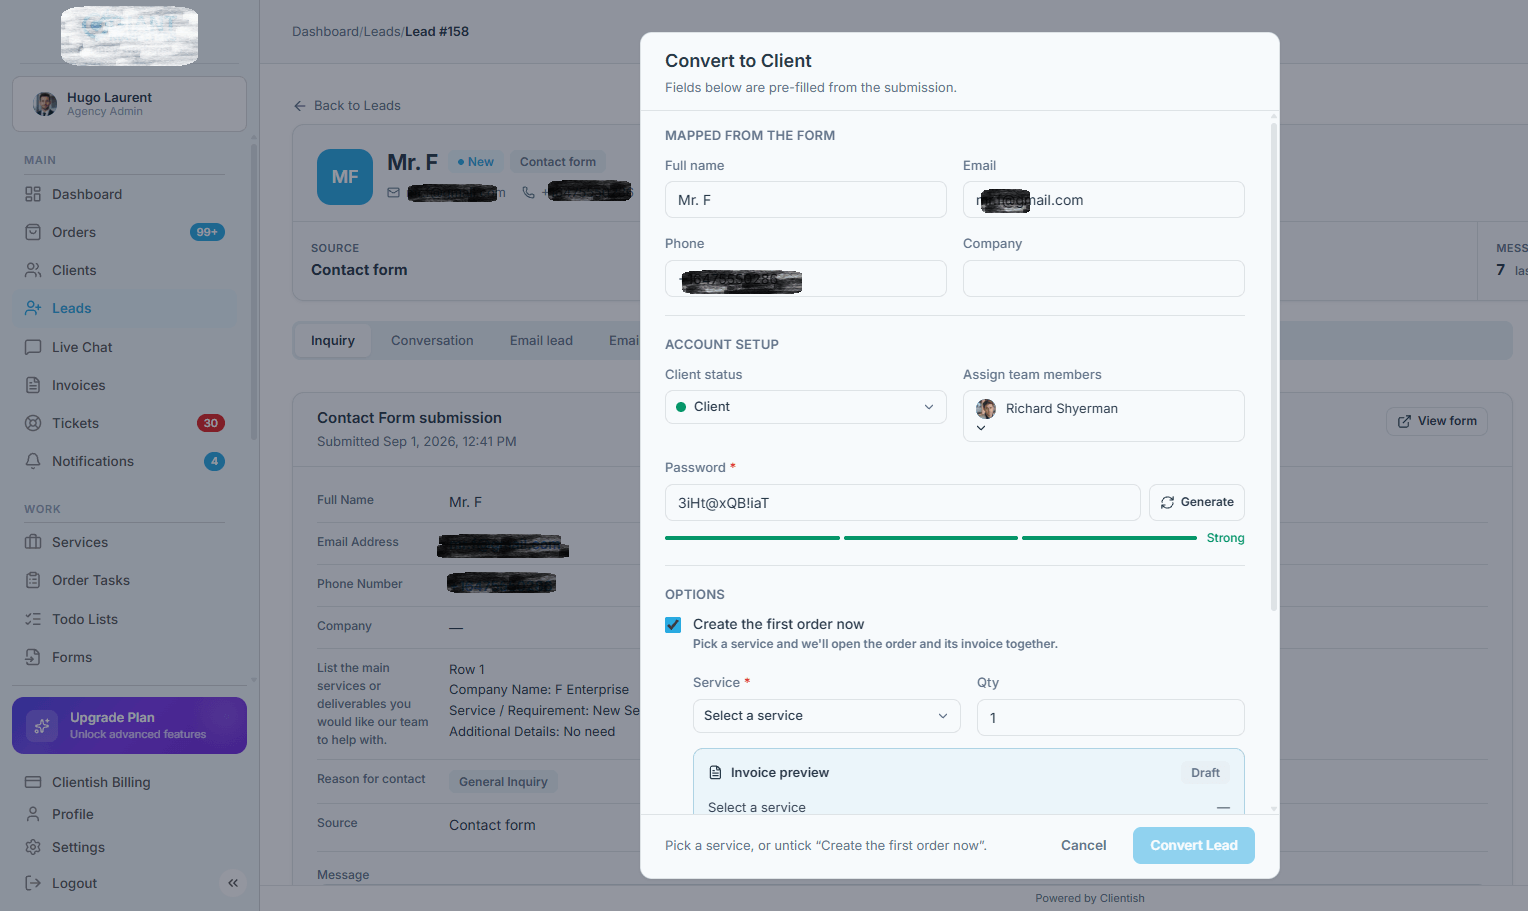
When a lead is ready to move forward, one step converts them to a client. The record’s history — notes, messages, activity — carries into the client profile. Nothing gets re-entered. From that point, the lead stage is done and the client directory takes over, which is where orders, invoices, and ongoing work begin.
Stage 2 – The Client Record Becomes the Hub
When a lead converts, Clientish creates a client record. Everything that happens from that point forward — orders, invoices, tickets, messages, payments — attaches to that one record.
One Record, Everything Attached
Open any client profile and you get tabbed access to their orders, invoices, support tickets, and a full activity log. Nothing lives in a separate sheet or a different tool. If a colleague picks up a client mid-project, that record is their entire briefing.
Lifecycle Stages
Every client sits in one of four fixed lifecycle stages. Clientish moves the client forward automatically when they pay — you don’t have to remember to update it manually. That keeps your pipeline accurate without extra admin.
Client Notes and Assignment
You can write internal notes directly on the client record and assign a specific team member as the client owner. Whoever owns that client sees it reflected in their workspace view.
The Client’s Own Portal
Clients get a portal login where they can see their orders, pay invoices, and raise support tickets. You can also impersonate a client from the admin side to see their exact view — useful when a client says something isn’t showing up correctly.
Ready to Order
With the client record in place, placing an order is the logical next step. Clientish ties the order directly to this record, which is how every subsequent invoice, task, and message stays connected to the right client from the start.
Stage 3 – Placing and Structuring the Order
Once a lead converts to a client, the next thing that needs to exist is somewhere to put the actual work. In Clientish, that’s the order — a record that captures not just what was sold, but everything the delivery team will need to act on it.
Ordering a Service
An order in Clientish is tied directly to a service from the catalog. When you create one, you’re selecting a defined service — with its pricing, deadline, and default assignees already attached. That context travels into the order from the start, so you’re not rebuilding it from scratch each time.
Capturing Requirements Up Front
Each service can have its own intake form, built with fields specific to that service’s needs. When a client places an order, they fill this in. Those answers sit inside the order record, editable after the fact and downloadable as a PDF or file bundle. The person doing the work can pull up exactly what the client submitted without hunting through emails.
Order Statuses and History
Orders move through a custom status pipeline. You define the statuses yourself per workspace, and every status change is logged in the order’s history trail. That log makes it easy to see how long something sat at a given stage — useful for spotting where jobs tend to stall.
The Order as the Work Container
The order holds everything connected to that job: intake answers, notes, tags, client messages, a separate internal team thread, file uploads, and the task checklist. When a team member opens an order, they get the full picture — no digging into a separate inbox or spreadsheet to piece together what’s going on.
Handing Off to the Team
Orders can be assigned to one or more team or remote members directly from the order record. Once assigned, the work shows up in that member’s view — their assigned orders, their tasks, their thread. That’s the handoff: the order is placed, requirements are captured, and the team now has a structured starting point rather than a brief forwarded over chat.
Stage 4 — Assigning the Team and Breaking Down Tasks
Once an order exists, the immediate question is who’s doing the work and what exactly they need to do. Clientish handles both in the same workflow, so assigning people and breaking work into tasks happen together rather than as separate admin steps.
Assigning the Order
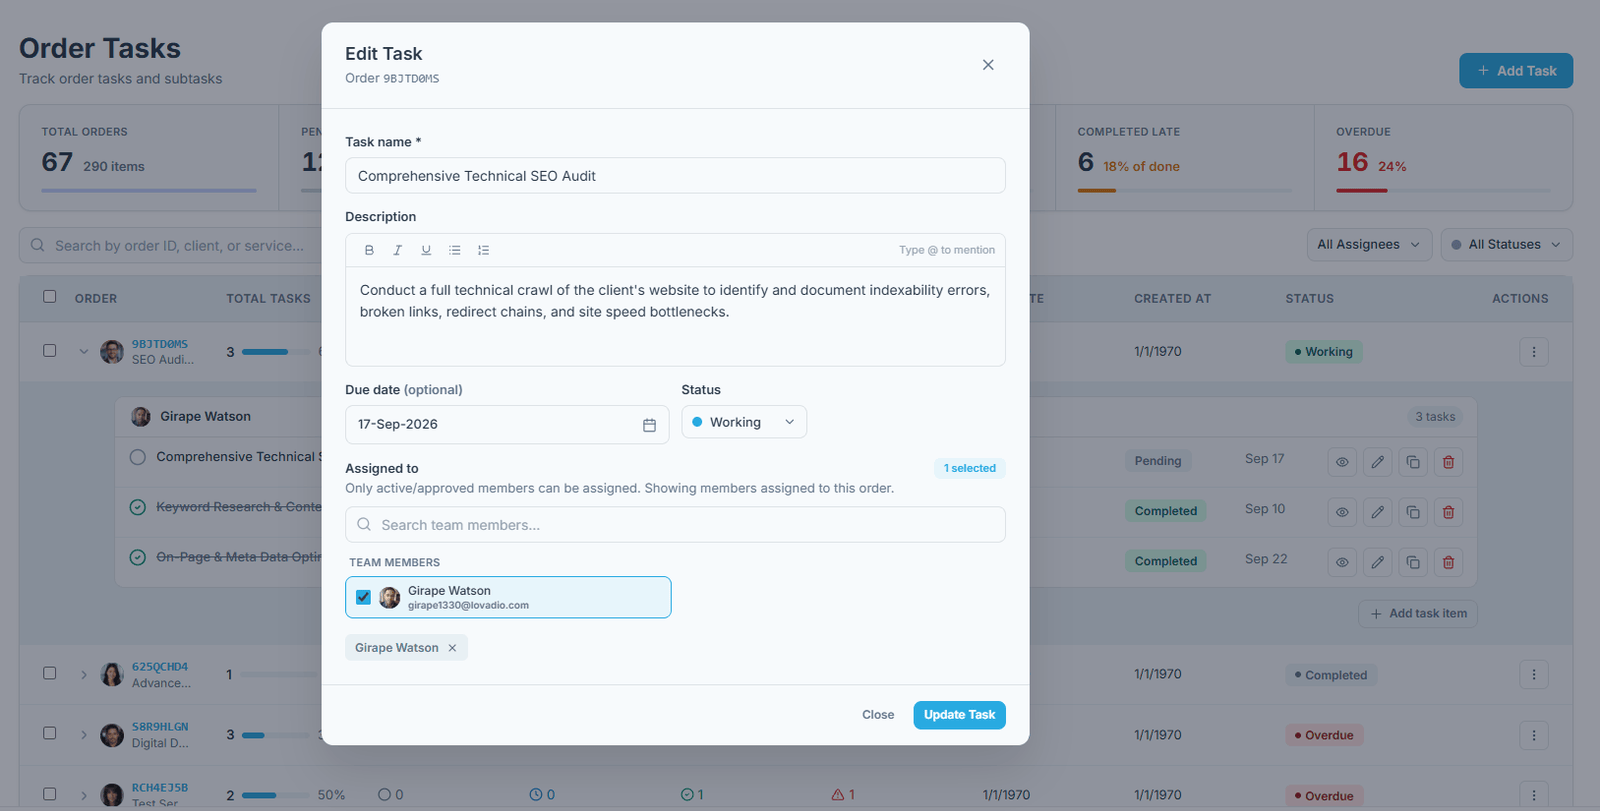
An order can be assigned to one or more team members or remote members directly from the order record. Clientish keeps a per-member view of assigned orders, so whoever’s on the job sees it in their own queue the moment it lands.
Breaking Work into Tasks
Inside each order, you can build a checklist of task items — individual steps the team needs to complete. Each task carries its own status: Pending, In Progress, Completed, Completed Late, or Overdue. That granularity matters when a job has five or six distinct deliverables that different people own.
Seeing Everyone’s Queue
The Tasks screen aggregates all task items across every active order into one place. You can filter by assignee, which means a team lead can pull up exactly what one person is carrying without opening each order individually. Bulk actions and pagination keep it manageable as volume grows.
In-House vs Remote Members
Team members and remote members are both assignable to orders and tasks, but they’re distinct account types in Clientish. Don’t treat them as interchangeable — remote members have their own access model separate from the in-house roster.
Keeping It on Track
Overdue status flags tasks that have slipped past their deadline without the team needing to chase updates manually. Combined with the per-member task view, a manager can spot bottlenecks before they affect delivery — which is the natural handoff point into the active delivery stage.
Stage 5 – Communicating and Delivering the Work
Once tasks are underway, the order becomes a live communication channel — for the client and for the team, through separate threads that don’t bleed into each other.
Client-Facing Order Messages
Every order in Clientish has a client-visible message thread. You can send updates, ask questions, or share progress directly from inside the order record. Clients receive these without needing to email you separately. Files can be attached to any message, so early drafts or proofs go through the same thread rather than a separate email chain.
Internal Team Discussion
Running alongside the client thread is a separate internal thread visible only to your team. This is where you can flag an issue, leave a note for the assigned member, or discuss something you don’t want the client to see yet — without switching to another tool.
Sharing Files and Deliverables
Both threads support file uploads, so the actual delivery file — the finished design, the written content, the recorded video — goes directly into the order. The client sees it in their portal without you having to attach it to an email.
Revisions and Approval
Clientish supports revision rounds on an order. When a client requests changes, you advance the order through a revision cycle rather than starting a new record. The history stays attached, so everyone can see what changed and when.
Marking It Delivered
When the work is complete and approved, you move the order to a delivered status. That status change is logged in the order’s timeline. At this point the order is ready for billing — one click creates an invoice directly from the order, which carries the job into the payment stage without any manual data re-entry.
Stage 6 — Invoicing and Getting Paid
Once an order is moving and work is underway, billing follows. Clientish keeps invoicing tied to the order record rather than sitting in a separate system, so the financial side of a job stays connected to the delivery side.
Creating the Invoice
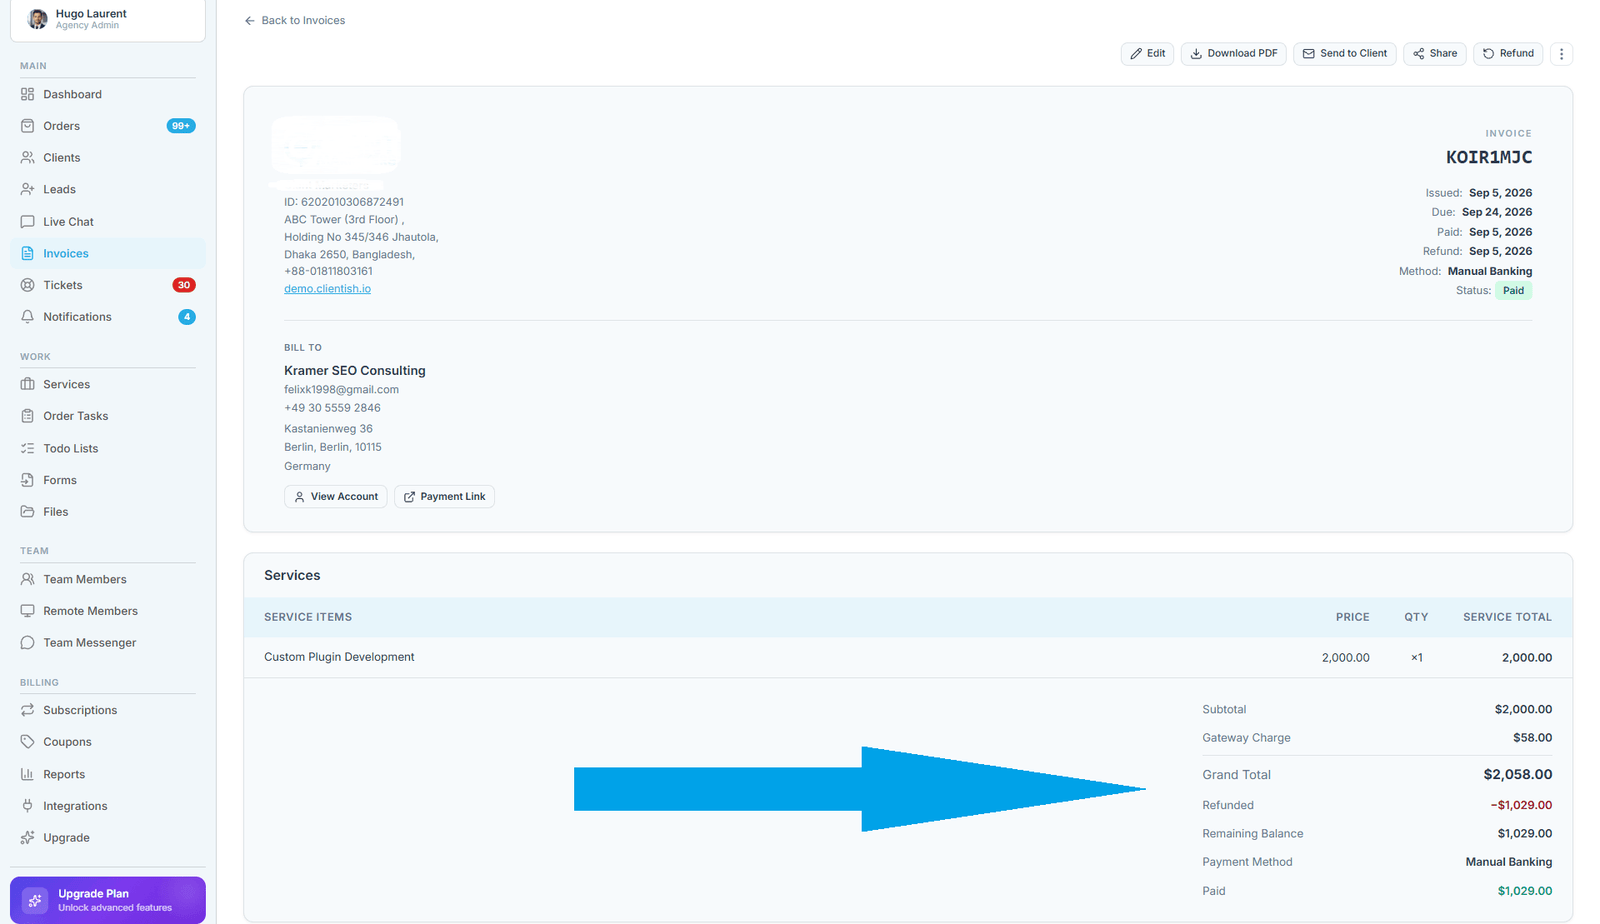
Someone on your team creates the invoice manually — Clientish doesn’t generate one automatically on every order. That’s a deliberate step. You open the order, create the invoice from it, and the line items pull from the service catalog. You can add taxes, apply a discount or coupon, adjust the billing address, and set a processing fee per gateway if needed.
Sending and the Pay Link
Once the invoice is ready, you send it by email directly from Clientish. Every invoice also gets a public pay link the client can open without logging in — useful when a client hasn’t set up their account yet or simply finds a direct link easier.
How Clients Pay
Clientish supports Stripe, PayPal, Paddle, SSLCommerz, and manual bank transfer. For bank transfer, the client submits a transfer reference, which keeps the paper trail intact. Clients can also pay from a pre-loaded account balance if they’ve deposited funds.
Recurring and Retainers
Services can be set as recurring, which is where retainer billing lives. When a client is on a recurring service, the billing cycle repeats against that same service setup — keeping the ongoing relationship structured rather than re-invoiced from scratch each month.
Refunds and Records
Refunds can be issued in full, half, or a custom amount with a reason attached. Every invoice carries its own activity log, so you have a clear record of what was sent, paid, and refunded. That history carries into the client profile, where the invoices tab and total spent figure stay current automatically — which matters when you’re picking up a support conversation and need to know where a client stands financially before you respond.
Stage 7 – Ongoing Support After Delivery
Delivery isn’t the end of the client relationship. Once work is handed over, questions come in, revisions get requested, and new needs surface. Clientish handles all of it in the same place, tied to the same client record.
Raising a Support Ticket
Clients can raise a support ticket directly from their portal. Your team sees it immediately, can respond, and track it through to resolution. Tickets are linked to the client record, so whoever picks it up has full context — order history, previous messages, everything — without asking the client to repeat themselves.
Real-Time Help via Live Chat
For faster back-and-forth, clients can reach the team through live chat. It’s separate from the ticket system, which matters: tickets suit issues that need tracking and a resolution trail; live chat suits quick questions that don’t need a formal log. Keeping the two distinct stops one-line queries from cluttering your support queue.
Everything Stays on the Client Record
Tickets and chats don’t live in a disconnected inbox. They attach to the client’s profile in Clientish, visible under the client’s own tab alongside their orders, invoices, and activity log. Anyone on the team can pick up a conversation without losing the thread.
Rating and Feedback
After an order completes, clients can leave a rating. That feedback is exportable, so you can track satisfaction across clients over time rather than just reading one-off comments.
From Support Back Into New Work
A resolved ticket or a positive rating is often the natural moment a client comes back for more. Because the client record already holds their history, creating a new order for them takes seconds — no re-entering details, no starting from scratch.
How the Workflow Adapts to Different Businesses
The lead-to-delivery sequence is the same for every Clientish workspace, but how much of it you actually use day-to-day depends on how your business is set up.
A solo freelancer running client work alone will probably skip most of the team assignment layer. There’s no one to assign to, so that stage is effectively invisible. The active path becomes: lead → client → order → tasks → invoice → done. Lighter, faster, fewer moving parts.
An agency with a team leans into the parts a freelancer skips. Assignment matters — who’s on this order, what’s their queue, where are tasks sitting. The internal message thread separates team conversation from client-facing communication. Role-based permissions mean a junior team member sees what they need and nothing else.
The flow itself doesn’t change shape based on who’s using it. What changes is which stages carry the most weight. A design studio might live in orders and revisions. A retainer-based SEO agency might use recurring service pricing and lean heavily on the support ticket stage for ongoing client requests after delivery. A productized service business might configure the same order structure and intake form for every client, making the intake-to-delivery path almost mechanical.
None of these variations require configuring a different system. The same workspace handles all of them — you just use the stages that fit your model and leave the rest in the background.
For a closer look at which business types get the most from Clientish and why, see the dedicated [Who Is Clientish For](#) article.
Getting Started With the Clientish Workflow
The setup sequence in Clientish roughly mirrors the workflow itself, so configuring things in order means each piece is ready before you need it.
Start with the onboarding wizard. It walks you through agency type, company details, logo, brand colour, and currency — the basics that flow through to client-facing documents like invoices and the portal. While you’re in the wizard, add your service categories and set your pricing model, because services drive everything downstream: intake forms, orders, invoices, and payment links all pull from the catalog you build here.
Once services are in place, configure your payment gateways. Clientish supports Stripe, PayPal, Paddle, aamarPay, SSLCommerz, and manual bank transfer. If you’re not ready to connect a gateway, manual bank transfer works fine to start — clients submit a transfer reference and you mark the invoice paid yourself.
Add your team members next. You can invite people by email during setup and assign roles, or do it afterward from the team roster. If you use remote members, they get their own workspace view showing only their assigned orders and tasks.
Turn the client portal on before you send anything to a client. It’s the interface your clients use to view orders, messages, invoices, and support tickets, so it needs to be live from the first order.
Before you go live, use demo data inside the workspace to walk through the full flow yourself — lead to client, order to invoice, payment to delivery. Seeing one complete example before a real client arrives saves a lot of back-and-forth later.
Frequently Asked Questions
A few recurring questions come up about how the whole workflow fits together. Here are the short answers.
What is the Clientish client workflow?
It’s the end-to-end sequence a client job moves through in Clientish: lead, client record, order, team assignment, tasks, invoice, payment, support ticket, and delivery. Each stage connects to the same client record, so context carries forward automatically.
Does a lead automatically become a client?
No. Converting a lead to a client is a deliberate one-step action your team takes inside the lead record. Clientish doesn’t do it automatically — you decide when the lead is ready.
Is an invoice created automatically for every order?
No. Someone on your team creates the invoice manually from the order record. Clientish doesn’t generate one without a human trigger.
How does the team know what to work on?
Each team member sees their assigned orders in a personal queue. Tasks are broken down per order and visible on the Tasks screen, filterable by assignee — so anyone can see exactly what’s in their court.
Does support connect back to the client’s history?
Yes. Support tickets are linked to the client record, so whoever picks up a ticket can see the client’s previous orders, invoices, and messages without asking for context.
Can the whole workflow run in one place?
Yes. Leads, clients, orders, tasks, invoices, payments, and support tickets all live inside one Clientish workspace — no separate tools required.
Does the workflow work for a solo freelancer?
It does. You can skip team assignment and run the full lead-to-delivery sequence yourself. The team features are there when you need them; they don’t get in the way when you don’t.
Final Thoughts
Every client job has the same basic shape: someone shows interest, you do the work, you get paid, and you stay in touch afterwards. What breaks that shape in most agencies is the switching — between a CRM, a project tool, an invoicing app, and an email thread that nobody can find six weeks later.
Clientish keeps it in one place. The lead record becomes the client record. The client record holds the order. The order holds the tasks, the messages, the invoice, and the support ticket. Nothing gets copied between systems, so nothing gets lost.
If you want to see how it fits your own setup, Clientish offers a 14-day free trial with full feature access — enough time to run a real client job through the whole workflow and judge it yourself.
